Introduction
This guide is targeted towards users who are already familiar with WordPress* and is designed to provide pointers and setting suggestions for BIOS, OS, WordPress, and system settings that will provide the optimal performance for most situations. However, please note that we rely on the users to carefully consider these settings for their specific scenarios, since WordPress can be deployed in multiple ways and this is a reference to one such use-case. The settings apply to running WordPress on a 2-socket Intel® Server System with a 3rd Generation Intel® Xeon® Scalable Processors. For this guide we will be using Ubuntu* 20.04.1 LTS and WordPress v5.2. Acquire and install the target software first. Dependent software binaries or licenses are not distributed with the workloads.
WordPress is a website builder and content management system. It is an open source software that anyone can use to make any kind of website imaginable. It started out as a blogging platform in 2003 but soon transformed into a CMS and later a full-fledged website building platform. Learn more about WordPress here: https://wordpress.org/. WordPress workload in this guide uses WordPress for content, PHP-FPM as server processes, Nginx as the web server, MariaDB* as the database and siege as the client, as explained in the later sections.
3rd Gen Intel® Xeon® Scalable processors deliver industry-leading, workload-optimized platforms with built-in AI acceleration, providing a seamless performance foundation to help speed data’s transformative impact, from the multi-cloud to the intelligent edge and back. Here are some of the features in these new processors:
- Enhanced Performance
- Enhanced Intel® Deep Learning Boost with VNNI
- More Intel® Ultra Path Interconnect
- Increased DDR4 Memory Speed & Capacity
- Intel® Advanced Vector Extensions
- Intel® Security Essentials and Intel® Security Libraries for Data Center
- Intel® Speed Select Technology
- Support for Intel® Optane™ Persistent Memory 200 series
BIOS Settings
BIOS can optimize configuration items and recommended values as follows:
| Configuration Item | Recommended Value |
| Hyper-Threading | Enable |
| Hardware Prefetcher | Enable |
| L2 RFO Prefetch Disable | Disable |
| Adjacent Cache Prefetch | Enable |
| DCU Streamer Prefetcher | Enable |
| DCU IP Prefetcher | Enable |
| LLC Prefetch | Enable |
| Total Memory Encryption (TME) |
Disable |
| SNC (Sub NUMA) |
Disable |
| UMA-Based Clustering | Hemisphere(2-clusters) |
| Snoop mode for AD | Disable |
| Snoopy mode for 2LM | Disable |
| Boot performance mode | Max Performance |
| Turbo Mode | Enable |
| Hardware P-State | Native Mode |
| Local/Remote Threshold | Auto |
Workload Architecture
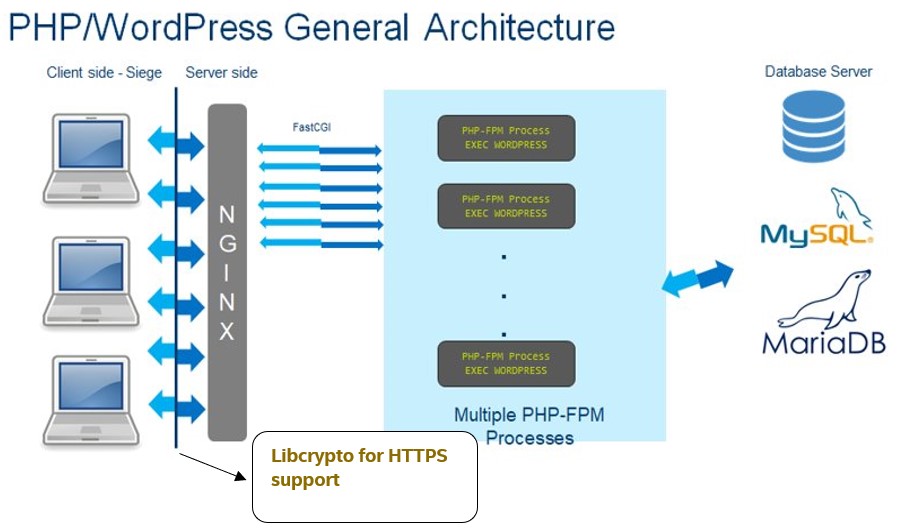
WordPress workload is a web-based workload with three critical components, namely server, database and the client. As seen above, this workload starts the Nginx which acts as a proxy server, then initializes the PHP engine, connects to the MariaDB database and runs the requests through Siege which is the client and finally reports out the throughput as a primary metric.
WordPress workload can be run in a single-node/multi-node mode.
- Single-node mode: all the three critical components, namely server, database and the client reside on the SUT (System Under Test).
- Multi-node: all the three components are put on different systems with the server component (PHP) and Nginx running on the SUT. Make sure the client and database chosen are configured in a way such that they don’t become the bottleneck. As a basic example, if the SUT is a 40-core system, it wouldn’t make sense to have a 4-core machine acting as client or database since they cannot process the number of requests that the SUT is actually capable of serving thus negatively impacting the performance.
WordPress deployment illustrated here takes advantage of the HTTPS crypto support in the encryption between Siege and Nginx.
System Set-up and Optimizations
Network configuration
When running in multi-node, that is SUT/Database/Client are running on three different machines, all three machines are connected by at least a 10G NIC card and they all reside on the same private subnet. Note that for a realistic deployment, running all the machines on the same private subnet may not always be a choice or the use-case. It’s a good idea to sanity check the baseline network performance through tools like sar/nload before running the WordPress workload.
Memory Configuration
At least 1 DIMM per memory channel needs to be populated. Lower cpu-utilization could be an issue if there are no DIMMs in a memory channel because of the contention from database cache.
Disk Configuration
<No special instructions for disks>
CPU Configuration
This guide was developed using a 3rd Generation Intel® Xeon® Scalable Processors.
- Set “performance” as frequency governor for all cores:
echo "performance" | sudo tee /sys/devices/system/cpu/cpu*/cpufreq/scaling_governor
Kernel Configuration
Note that the kernel settings and commands are for this specific WordPress deployment, and are not general guidelines.
- Flush file system buffers:
sudo sync
- Free pagecache, dentries and inodes:
sudo sh -c 'echo 3 >/proc/sys/vm/drop_caches'
- Free swap:
sudo swapoff -a > /dev/null 2>&1

sudo swapon -a > /dev/null 2>&1
- Disable auditd daemon (if installed):
sudo service auditd stop || true
- Enable ip_conntrack
sudo modprobe ip_conntrack
- Increase nf_conntrack hashtable size. Tune the size of connection tracking table based on available RAM. Look out for messages such as “nf_conntrack: table full, dropped packet” in kern.log and increase the value as needed:
echo 512000 | sudo tee /proc/sys/net/netfilter/nf_conntrack_max
- Set tcp socket reuse. Allows us to reuse sockets in TIME_WAIT state for new connections:
echo 1 | sudo tee /proc/sys/net/ipv4/tcp_tw_reuse
- Tunings for number of open files/locked in-memory address space by the regular and user space quota, using the following parameters in /etc/security/limits.conf:
- soft nofile 1000000
- hard nofile 1000000
- soft memlock unlimited
- hard memlock unlimited
WordPress Workload Settings
- For optimal performance, task-set PHP to cores by affinitizing each php-fpm thread to a vCPU.
- If running on one socket, enable MySQL QueryCache with our pre-set set cache sizes:
open_files_limit=4000
query_cache_limit=128K
query_cache_size=1M
query_cache_type=1
QueryCache is suggested to be disabled if running on two sockets. For a larger database and server machine typically >=28C, it might be best to completely disable query_cache. The 1S query_cache settings serve as a reference recommendation when the memory available is much smaller.
- Tune the number of server processes based on the number of CPUs (including logical cores). We suggest that if CPUs count is <=16, server workers count be 2.5*CPUs count. If CPUs count is <=95, server workers count is 2*CPUs count otherwise it is 1.5*CPUs count.
- Tune the number of client threads. To find the optimal load, a client sweep is suggested to be performed and the client threads with the optimal performance be chosen.
- To reduce cross-numa node access and increase performance, different WordPress instances can be bound to different sockets through containers.
Crypto-Optimizations
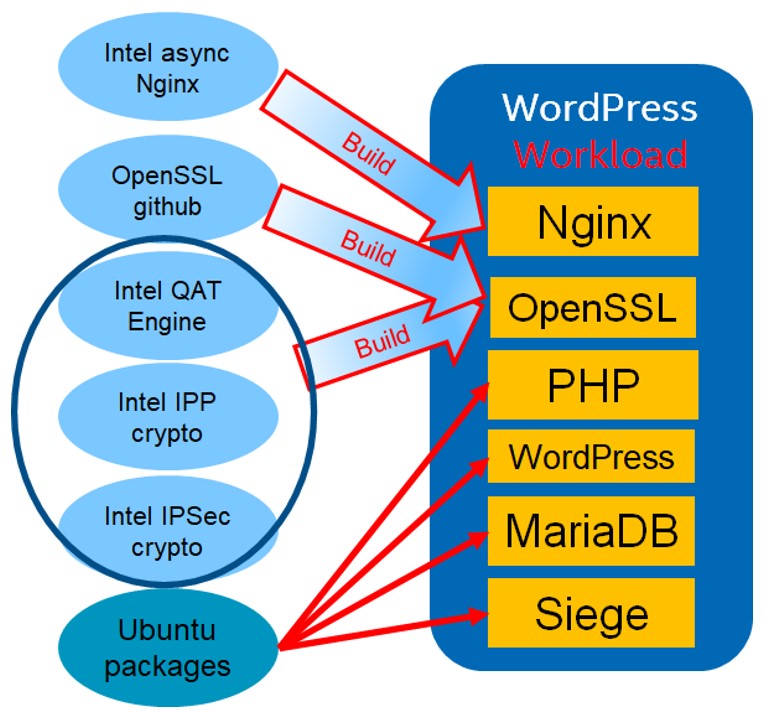
Fig.1 Suggested WordPress Software Stack
This section details the use of crypto libraries for adding HTTPS support to the WordPress workload. As can be seen in the above diagram, WordPress workload on the left is one of the many scenarios that a WordPress application can be deployed in. The guide settings is one such configuration example.
Software libraries:
Please note that the versions for the libraries noted below are expected to change as they are maintained, and it’s up to the users to pick the most current versions
| Libraries | Version | Link |
| OpenSSL | OpenSSL 1.1.1f | https://github.com/openssl/openssl |
| IPP-Crypto | ippcp_2020u3 | https://github.com/intel/ipp-crypto |
| QAT engine | v0.6.5 | https://github.com/intel/QAT_Engine |
| Async Nginx | v0.4.5 | https://github.com/intel/asynch_mode_nginx |
| Multi-buffer crypto for IPSec | V0.55 | https://github.com/intel/intel-ipsec-mb |
Ciphers used:
ECDHE-RSA-AES128-GCM-SHA256
TLS_AES_256_GCM_SHA384
For example,
- TLSv1.2 - ECDHE-RSA-AES128-GCM-SHA256
- TLSv1.3 - TLS_AES_256_GCM_SHA384
Building Software Libraries:
Packages needed:
sudo apt-get install libudev-dev libssl-dev libboost-all-dev zlib1g-dev autoconf make build-essential libnl-3-dev libnl-genl-3-dev yasm cmake libpcre3 libpcre3-dev
Environmental variables:
#ROOT_DIR is the main directory when git repos are being downloaded

export OPENSSL_SOURCE=$ROOT_DIR/openssl/

export OPENSSL_LIB=$ROOT_DIR/openssl_install/

export OPENSSL_ENGINES=$ROOT_DIR/openssl_install/lib/engines-1.1/

export NGINX_INSTALL_DIR=$ROOT_DIR/nginx_install/

export IFMA_SOURCE=$ROOT_DIR/ipp-crypto/sources/ippcp/crypto_mb/

export IPSEC_SOURCE=$ROOT_DIR/$SSL_DIR/intel-ipsec-mb/

export IPSEC_INSTALL=$ROOT_DIR/$SSL_DIR/intel-ipsec-mb-install/
OpenSSL:
git clone https://github.com/openssl/openssl.git

cd openssl

git checkout OpenSSL_1_1_1f

make clean

make distclean

./config --prefix=$OPENSSL_LIB -Wl,-rpath,$OPENSSL_SOURCE

make update

make depend

make -j

make install
IPP-Crypto
git clone https://github.com/intel/ipp-crypto.git

cd ipp-crypto

git checkout ipp-crypto_2020_update3

cd sources/ippcp/crypto_mb

cmake . -B"./build" -DOPENSSL_INCLUDE_DIR=$OPENSSL_SOURCE/include/ -DOPENSSL_LIBRARIES=$OPENSSL_LIB -DOPENSSL_ROOT_DIR=$OPENSSL_SOURCE/

cd build

make -j

ls $IFMA_SOURCE/build/bin/libcrypto_mb.so #File must exist

mkdir $IFMA_SOURCE/lib/

ln -s $IFMA_SOURCE/build/bin/libcrypto_mb.so $IFMA_SOURCE/lib/

IPSec library

cd ROOT_SOURCE

git clone https://github.com/intel/intel-ipsec-mb.git

cd intel-ipsec-mb

git checkout v0.55

make

make install PREFIX=$IPSEC_INSTALL
QAT Engine:
cp $IPSEC_INSTALL/lib/* $IFMA_SOURCE/lib/

cp $IPSEC_INSTALL/include/* $IFMA_SOURCE/include/

git clone https://github.com/intel/QAT_Engine.git

cd QAT_Engine

git checkout v0.6.5

for i in 1 2;

do

multi_buffer_string="--enable-qat_sw --with-qat_sw_install_dir=$IFMA_SOURCE --with-openssl_install_dir=$OPENSSL_LIB"


make clean

./autogen.sh

./configure $multi_buffer_string

make -j

make install -j

done

ls $OPENSSL_LIB/lib/engines-1.1

afalg.so capi.so padlock.so qatengine.la qatengine.so
Async Nginx:
git clone https://github.com/intel/asynch_mode_nginx.git

cd asynch_mode_nginx

git checkout v0.4.5

./configure \

--prefix=$NGINX_INSTALL_DIR \

--with-http_ssl_module \

--add-dynamic-module=modules/nginx_qat_module \

--with-cc-opt="-DNGX_SECURE_MEM -I$OPENSSL_LIB/include -Wno-error=deprecated-declarations" \

--with-ld-opt="-Wl,-rpath=$OPENSSL_LIB/lib -L$OPENSSL_LIB/lib"

make

make install
Library files to use in WordPress:
Copy files needed into one folder named qatengine with $qatengine as its path.
cd $qatengine

mkdir lib bin engine ngx_modules

cp $OPENSSL_LIB/bin/openssl $qatengine/bin

cp $NGINX_INSTALL_DIR/sbin/nginx $qatengine/bin

cp $OPENSSL_LIB/lib/engines-1.1/qatengine.so $qatengine/engine

cp $OPENSSL_LIB/lib/libcrypto.so.1.1 $qatengine/lib

cp $OPENSSL_LIB/lib/libssl.so.1.1 $qatengine/lib

cp $IFMA_SOURCE/lib/libcrypto_mb.so $qatengine/lib

cp $IPSEC_INSTALL/lib/libIPSec_MB.so.0 $qatengine/lib

cp $NGINX_INSTALL_DIR/modules/ngx_ssl_engine_qat_module.so $qatengine/ngx_modules

cp $OPENSSL_LIB/ssl/openssl.cnf $qatengine

export LD_LIBRARY_PATH=$qatengine/lib

export OPENSSL_ENGINES=$qatengine/engine

export PATH=$qatengine/bin:$PATH

export OPENSSL_CONF=$qatengine/openssl.cnf

#To check if qatengine can be loaded by openssl

openssl speed -engine qatengine -elapsed -async_jobs 8 rsa2048
Keys Generation:
Generate key/certficate for RSA:
openssl req -x509 -sha256 -nodes -days 365 -newkey rsa:2048 -keyout certs/server.key -out certs/server.crt -subj "/C=/ST=/L=/O=/OU=/CN=$(hostname)"

Generate key/certficate for DSA:

openssl ecparam -genkey -out certs/key.pem -name prime256v1

openssl req -x509 -new -key certs/key.pem -out certs/cert.pem -subj "/C=/ST=/L=/O=/OU=/CN=$(hostname)"
Nginx conf file:
worker_processes 128; #Set to the number of logical cores

load_module ngx_modules/ngx_ssl_engine_qat_module.so;

ssl_engine{

use_engine qatengine;

default_algorithms ALL;

qat_engine{

qat_notify_mode poll;

qat_offload_mode async;

qat_external_poll_interval 1;

}}

worker_rlimit_nofile 1000000;

events

{

use epoll;

worker_connections 8192;

multi_accept on;

accept_mutex on;

}

http {

ssl_buffer_size 65536;

types_hash_max_size 4096;

types_hash_bucket_size 64;

sendfile on;

server {

listen [::]:__HTTP_PORT__ reuseport backlog=131072 so_keepalive=off rcvbuf=65536 sndbuf=65536 default_server;

listen __HTTP_PORT__ reuseport backlog=131072 so_keepalive=off rcvbuf=65536 sndbuf=65536 default_server;

sendfile on;

keepalive_timeout 0s;

tcp_nopush on;

tcp_nodelay on;

ssl_verify_client off;

ssl_session_tickets off;

lingering_close off;

lingering_time 1;

ssl on;

ssl_asynch on;

ssl_certificate server.crt # For DSA use cert.pem instead of server.crt

ssl_certificate_key server.key # For DSA use key.pem instead of server.key


ssl_session_timeout 300s;

ssl_protocols TLSv1.2;

ssl_prefer_server_ciphers on;

ssl_ciphers ECDHE-RSA-AES128-GCM-SHA256;

ssl_ecdh_curve secp384r1; // recommend replacing secp384r1 with the curve you intend to use, for example, secp384r1/ prime256v1

...

}}
Please note that like many other directives in the nginx.conf, the cipher and curve used for key exchange and authentication will have a considerable impact on the performance. Your workload performance may vary depending on the exact curve/cipher being used. We suggest users to take this into account while tuning their workload.2
Best practices for testing and verification
Note that the recommendations in the guide for WordPress workload are only a reference, and the tunings here should be carefully adopted by someone who is well-versed with the workload and the system settings.
- Since this is a CPU-bound web front-end workload, when all the requests are appropriately distributed, we expect ~90+% CPU-utilization. Use tools like sar/htop to verify you get the expected CPU utilization.
- Execute at least 7 runs to ensure the standard deviation is within 5%.
- Restart MariaDB service after every run to clear query cache. This is specific to the workload and not a recommendation for the real-world web deployments.
References
-
https://www.wpbeginner.com/beginners-guide/what-is-wordpress/
Notices & Disclaimers
Intel technologies may require enabled hardware, software or service activation.
No product or component can be absolutely secure.
Your costs and results may vary.
Code names are used by Intel to identify products, technologies, or services that are in development and not publicly available. These are not "commercial" names and not intended to function as trademarks
The products described may contain design defects or errors known as errata which may cause the product to deviate from published specifications. Current characterized errata are available on request.© Intel Corporation. Intel, the Intel logo, and other Intel marks are trademarks of Intel Corporation or its subsidiaries. Other names and brands may be claimed as the property of others