Visible to Intel only — GUID: lxd1568279892025
Ixiasoft
1. Quick Start Guide
2. 10GBASE-R Ethernet Design Example
3. 10M/100M/1G/2.5G/10G Ethernet Design Example
4. 1G/2.5G Ethernet Design Example with IEEE 1588v2 Feature
5. 1G/2.5G/10G Ethernet Design Example with IEEE 1588v2 Feature
6. 10M/100M/1G/2.5G/5G/10G (USXGMII) Ethernet Design Example
7. Interface Signals Description
8. Configuration Registers Description
9. Low Latency Ethernet 10G MAC Intel® Stratix® 10 FPGA IP Design Example User Guide Archives
10. Document Revision History for the Low Latency Ethernet 10G MAC Intel® Stratix® 10 FPGA IP Design Example User Guide
Visible to Intel only — GUID: lxd1568279892025
Ixiasoft
1.4.1. Procedure
To change the target device in your hardware design example, follow these steps:
- Launch the Intel® Quartus® Prime Pro Edition software and open the hardware test project file /hardware_test_design/altera_eth_top.qpf.
- On the Assignments menu, click Device. The Device dialog box appears.
- In the Device dialog box, select the device in the target device table that matches the device part number on your development kit. Refer to the Intel® Stratix® 10 GX Signal Integrity Development Kit link on the Intel® website for more information.
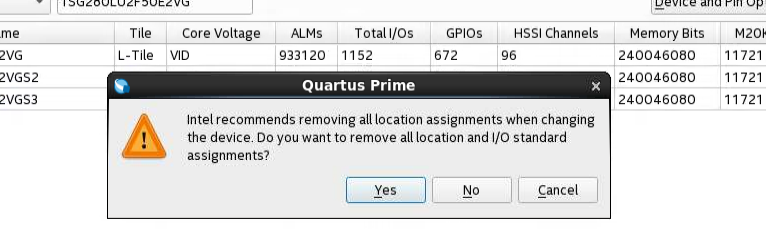
- A prompt appears when you select a device, as shown in the figure below. Select No to preserve the generated pin assignments and I/O assignments.
Figure 5. Intel® Quartus® Prime Prompt for Device Selection
- If you select an L-Tile GX device such as 1SG280LU2F50E2VG as your target device, click Upgrade IP Components in Project menu, select L-Tile/H-Tile Transceiver Native PHY Intel® Stratix® 10 FPGA IP from the list of IP components, and click Upgrade in Editor. Regenerate this IP component.
Note: If you select H-Tile GX as your target device, skip this step if you are using the same Quartus and IP version.
- Perform full compilation of your design.
You can now test the design on your hardware.
Note: No other pin assignment modifications are required for the design example. When you generate the design example targeting other Intel® Stratix® 10 development kits, refer to the respective development kit user guides for pin assignment.
Related Information