Visible to Intel only — GUID: ntz1535573669856
Ixiasoft
2.2.1. Timing Path and Clock Analysis
2.2.2. Clock Setup Analysis
2.2.3. Clock Hold Analysis
2.2.4. Recovery and Removal Analysis
2.2.5. Multicycle Path Analysis
2.2.6. Metastability Analysis
2.2.7. Timing Pessimism
2.2.8. Clock-As-Data Analysis
2.2.9. Multicorner Timing Analysis
2.2.10. Time Borrowing
3.1. Timing Analysis Flow
3.2. Step 1: Specify Timing Analyzer Settings
3.3. Step 2: Specify Timing Constraints
3.4. Step 3: Run the Timing Analyzer
3.5. Step 4: Analyze Timing Reports
3.6. Applying Timing Constraints
3.7. Timing Analyzer Tcl Commands
3.8. Timing Analysis of Imported Compilation Results
3.9. Using the Intel® Quartus® Prime Timing Analyzer Document Revision History
3.10. Intel® Quartus® Prime Pro Edition User Guide: Timing Analyzer Archive
3.5.1.1. Report Fmax Summary
3.5.1.2. Report Timing
3.5.1.3. Report Timing By Source Files
3.5.1.4. Report Data Delay
3.5.1.5. Report Net Delay
3.5.1.6. Report Clocks and Clock Network
3.5.1.7. Report Clock Transfers
3.5.1.8. Report Metastability
3.5.1.9. Report CDC Viewer
3.5.1.10. Report Asynchronous CDC
3.5.1.11. Report Logic Depth
3.5.1.12. Report Neighbor Paths
3.5.1.13. Report Register Spread
3.5.1.14. Report Route Net of Interest
3.5.1.15. Report Retiming Restrictions
3.5.1.16. Report Register Statistics
3.5.1.17. Report Pipelining Information
3.5.1.18. Report Time Borrowing Data
3.5.1.19. Report Exceptions and Exceptions Reachability
3.5.1.20. Report Bottlenecks
3.6.1. Recommended Initial SDC Constraints
3.6.2. SDC File Precedence
3.6.3. Modifying Iterative Constraints
3.6.4. Using Entity-bound SDC Files
3.6.5. Creating Clocks and Clock Constraints
3.6.6. Creating I/O Constraints
3.6.7. Creating Delay and Skew Constraints
3.6.8. Creating Timing Exceptions
3.6.9. Using Fitter Overconstraints
3.6.10. Example Circuit and SDC File
3.6.8.5.1. Default Multicycle Analysis
3.6.8.5.2. End Multicycle Setup = 2 and End Multicycle Hold = 0
3.6.8.5.3. End Multicycle Setup = 2 and End Multicycle Hold = 1
3.6.8.5.4. Same Frequency Clocks with Destination Clock Offset
3.6.8.5.5. Destination Clock Frequency is a Multiple of the Source Clock Frequency
3.6.8.5.6. Destination Clock Frequency is a Multiple of the Source Clock Frequency with an Offset
3.6.8.5.7. Source Clock Frequency is a Multiple of the Destination Clock Frequency
3.6.8.5.8. Source Clock Frequency is a Multiple of the Destination Clock Frequency with an Offset
Visible to Intel only — GUID: ntz1535573669856
Ixiasoft
3.6.4.2. Entity-bound Constraint Examples
This example illustrates how to employ entity-bound constraints to target a specific entity, highlighting the distinction between automatic and manual scoping.
Automatic Scope Example
In the following design, two instances of the clk_div entity are constrained using the entity-bound SDC file approach. After the design undergoes the Fitter planning stage and the timing netlist becomes available, follow the steps below to associate an SDC file with a particular entity in your design:
Figure 95. Automatic Scope Example
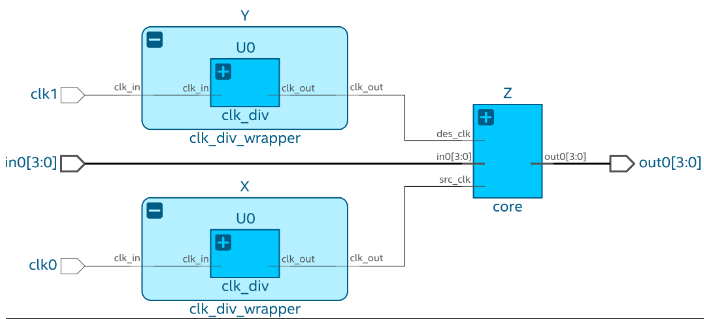
- Create a non-entity-bound SDC file that defines constraints targeted by a global scope and add it to the project. For this design, two clocks (clk0 and clk1 are defined.
# global.sdc
create_clock -period 100MHz -name clk_100 [get_ports clk0]
create_clock -period 75MHz -name clk_75 [get_ports clk1]
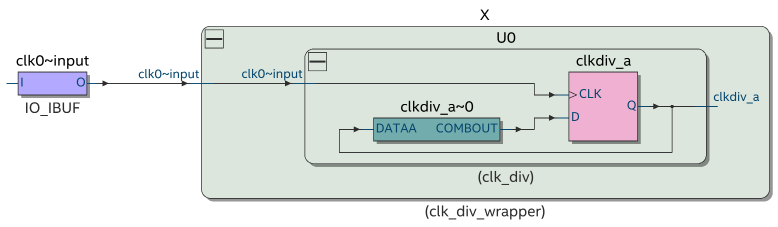
- Create a second SDC file to constrain your target entity and add it to the project. This file follows the entity-bound approach and is associated with the clk_div entity. Consequently, constraints are defined as if this entity were at the top-level hierarchy, with path names relative to the entity. For example, the get_pins clkdiv_a|q command does not require the X|U0 hierarchy. In this example, the get_current_instance Tcl command is used to generate a unique name for each clock.
In this specific case, the SDC file creates a new clock on the output of the module, and the get_current_instance Tcl command is used to generate a unique name for each clock.
# clk_div.sdc
set unique_clock_name "[get_current_instance]_clkout"
create_generated_clock -divide_by 2 -source [get_pins clkdiv_a|clk] -name $unique_clock_name [get_pins clkdiv_a|q]
- Launch the File Properties dialog for the SDC file associated with the clk_div entity from the files list in the left-hand Project Tasks pane.
- Select the SDC File with entity binding (Read by the Timing Analyzer at each fitter stage) option in the Type drop-down list.
- In the Entity drop-down list, select clk_div .
This applies automatic scoping to the entity-bound file, where all paths in filter commands are prepended with the top-level path of the current hierarchy. For instance, the command get_registers clkdiv_a is dynamically transformed into its fully hierarchical counterpart, such as get_registers X|U0|clkdiv_a.
Note: The design must have passed the Synthesis stage to populate the list of entities.
Figure 96. File Properties Dialog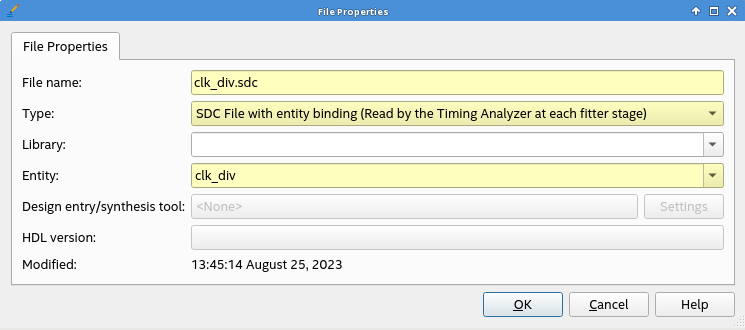
You can perform this task via the QSF assignment method as follows:
set_global_assignment -name SDC_ENTITY_FILE clk_div.sdc -entity clk_div
- Recompile the project to apply the changes. This results in the corresponding SDC file being effectively bound to the entity in the automatic scope mode.
- Verify the implementation of the entity-bound property by consulting the SDC File List report in the Timing Analyzer. This report offers a comprehensive inventory of the applied SDC files for the design. For entity-bound SDC files, the report presents crucial information, including the associated instance, entity name, library, and the status of automatic scoping, as shown in the following image:
Figure 97. SDC File List Report in the Timing Analyzer

- Determine the correct application of each constraint according to the intended purpose. For example, examine the generated clocks and cross-reference with the clock hierarchy to determine if the constraints are successfully applied, as shown in the following images:
Figure 98. Create Generated Clock Window in the Timing Analyzer
 Figure 99. Clock Hierarchy Summary Window in the Timing Analyzer
Manual Scope Example
To modify the scope of the entity-bound SDC file to manual, for example, to target elements outside the entity, utilize QSF assignments. By including the -no_sdc_promotion parameter in the entity-bound SDC file definition, you can disable the software's practice of prepending each collection filter with the full path of the current instance. For example, to change to manual scope, the SDC file associated with the clk_div entity in the automatic scope example above, add the -no_sdc_promotion parameter as follows:
set_global_assignment -name SDC_ENTITY_FILE clk_div.sdc -entity clk_div -no_sdc_promotion
To scope your collection filters precisely, use the get_current_instance command. By delivering the top-level path to the present instance, it streamlines the process of scoping filters directed towards elements confined within instance boundaries.
# clk_div.sdc
set current_entity_instance [get_current_instance]
set unique_clock_name "${current_entity_instance}_clkout"
create_generated_clock -divide_by 2 -source [get_pins clkdiv_a|clk] \
-name $unique_clock_name [get_pins ${current_entity_instance}|clkdiv_a|q]
When the automatic scope is disabled for a designated entity-bound SDC file, the SDC File List report within the Timing Analyzer distinctly indicates this change by displaying "No" in the promoted column, as follows:
Figure 100. SDC File List Report in the Timing Analyzer

By following this methodology, you can seamlessly harmonize the SDC entity binding process with your design flow, improving efficiency and accuracy in the constraint management.
Exporting and Importing a Design Partition with Entity-Bound Constraints
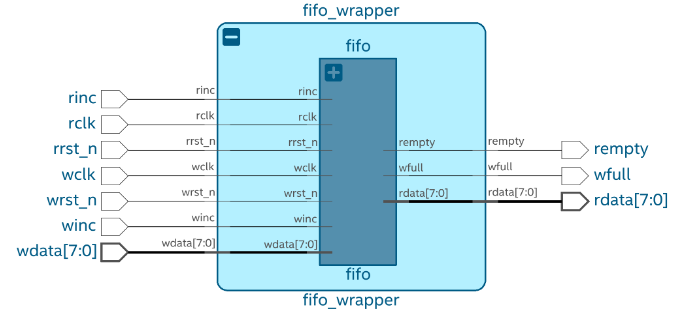
The following example serves as a comprehensive guide for associating an SDC file with an entity included within a partition that is subsequently imported into a different Intel® Quartus® Prime project. The example focuses on the fifo entity within the following design:
Figure 101. Entity-Bound Constraints Design Example
Exporting a Design Partition
Perform these steps to export a design partition with entity-bound constraints:
- After applying the constraints to the fifo entity and compiling the design successfully through an initial run through the fitter stage, designate the fifo entity as a standard partition using the Default option in the Assignments view of the Design Partition dialog, as shown in the following:
Figure 102. Assignments View of the Design Partition Dialog

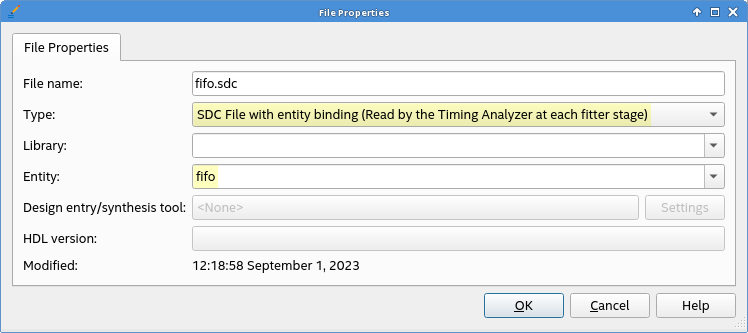
- Employ the entity-bound SDC file approach to establish the connection between the fifo entity and the respective SDC file.
Figure 103. File Properties Dialog
- Compile the entire design through the full compilation flow for the new configurations to take effect.
- Confirm the correct association of the SDC file with the fifo entity by consulting the SDC File List report in the Timing Analyzer. This report serves as a valuable checkpoint to verify the SDC association.
Figure 104. SDC File List Report in the Timing Analyzer

- In the Intel® Quartus® Prime GUI, navigate to the Project menu and click Export Design Partition. Perform the following in the Export Design Partition dialog:
- Select the partition to export in the Partition name drop-down list.
- Attach the partition database file using the browse button in the Partition Database File field.
- Select the Include entity-bound SDC files for the selected partition checkbox for entity-bound SDC files linked to the chosen partitions.
- Specify your preference by selecting either Synthesized or Final in the Snapshot drop-down.
Figure 105. Export Design Partition Dialog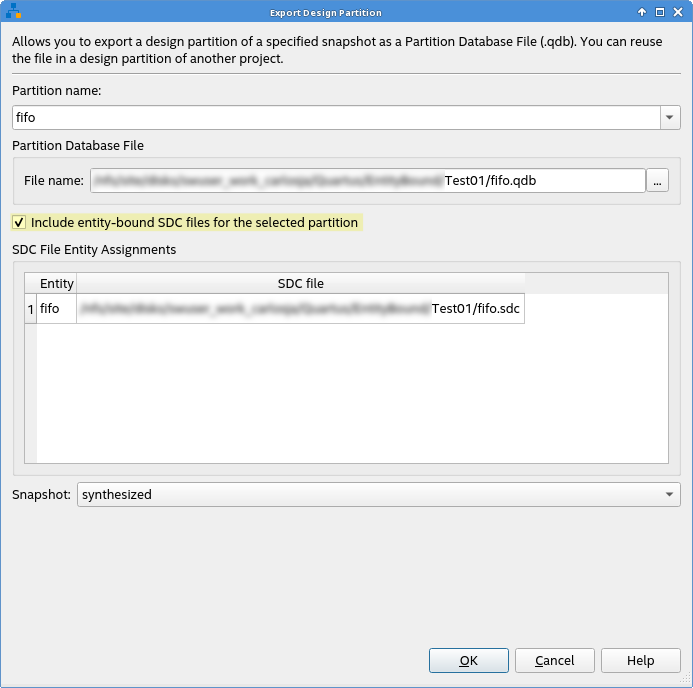
Importing a Design Partition
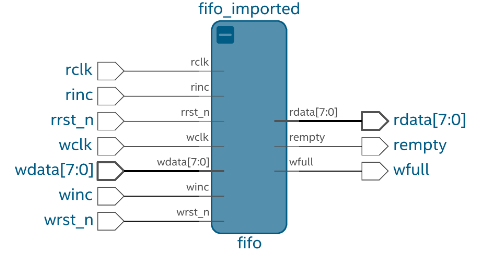
Importing a partition with entity-bound SDC files linked to an entity in a new design requires the presence of a black box wrapper for the entity within your design. This wrapper declares a partition in which the data from the imported partition is utilized. Consider the following example with an entity named fifo_imported:
Figure 106. Example of an Entity Named fifo_imported
Perform these steps to import a design partition with entity-bound constraints:
- Ensure the design is successfully compiled until the Synthesis stage.
- Create a new partition within the wrapper entity using the Assignments View of the Design Partition dialog and populating the data:
- Specify the partition name and the hierarchy path of the entity instance.
- Specify Default for the partition type.
- Enter synthesized in the Preservation Level column.
- Add the .qdb file from the previous project under the Partition Database File column.
Figure 107. Assignments View of the Design Partition Dialog

- Compile the project to complete the entire compilation flow.
- Verify the correct application of the entity-bound SDC file assignment. Use the SDC File List report in the Timing Analyzer to confirm the application of respective constraints.
Figure 108. SDC File List Report in the Timing Analyzer

By following these comprehensive steps, you can seamlessly manage the association of SDC files with entities within partitions and ensure their proper implementation when imported into different projects.