Visible to Intel only — GUID: nik1412546873302
Ixiasoft
5.1. Understanding the Design Steps for CvP Initialization Mode
5.2. Understanding the Design Steps for CvP Initialization Mode with the Revision Design Flow
5.3. Understanding the Design Steps for CvP Update Mode
5.4. Bringing Up the Hardware
5.5. CvP Debugging Check List
5.6. Known Issues and Solutions
5.2.1. Downloading and Generating the High Performance Reference Design
5.2.2. Workaround for a Known Issue with Transceiver Reconfiguration Controller IP Core
5.2.3. Creating an Alternate user_led.v File for the Reconfigurable Core Region
5.2.4. Setting up CvP Parameters for CvP Initialization Mode
5.2.5. Creating CvP Revisions of the Core Logic Region Using the CvP Revision Design Flow
5.2.6. Compiling both the Base and cvp_app Revisions in the CvP Revision Design Flow
5.2.7. Splitting the SOF File for the CvP Initialization Mode with the CvP Revision Design Flow
5.3.1. Downloading and Generating the High Performance Reference Design
5.3.2. Workaround for a Known Issue with Transceiver Reconfiguration Controller IP Core
5.3.3. Creating an Alternate user_led.v File for the Reconfigurable Core Region
5.3.4. Setting up CvP Parameters for CvP Update Mode
5.3.5. Creating CvP Revisions of the Core Logic Region Using the CvP Revision Design Flow
5.3.6. Compiling the Design for the CvP Update Mode
5.3.7. Splitting the SOF File for the CvP Update Design Mode
5.3.8. Splitting the SOF File for the CvP Update Mode with the CvP Revision Design Flow
6.3.1. Altera-defined Vendor Specific Capability Header Register
6.3.2. Altera-defined Vendor Specific Header Register
6.3.3. Altera Marker Register
6.3.4. CvP Status Register
6.3.5. CvP Mode Control Register
6.3.6. CvP Data Registers
6.3.7. CvP Programming Control Register
6.3.8. Uncorrectable Internal Error Status Register
6.3.9. Uncorrectable Internal Error Mask Register
6.3.10. Correctable Internal Error Status Register
6.3.11. Correctable Internal Error Mask Register
Visible to Intel only — GUID: nik1412546873302
Ixiasoft
5.2.7. Splitting the SOF File for the CvP Initialization Mode with the CvP Revision Design Flow
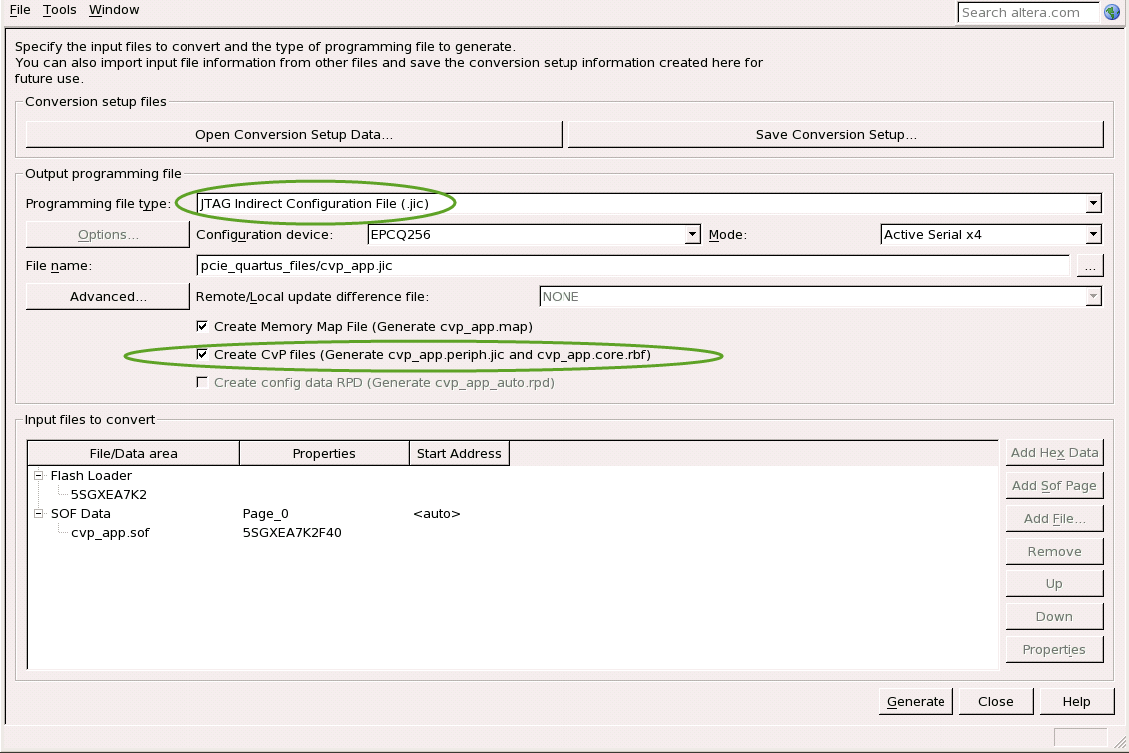
To implement the CvP Revision Design Flow in CvP initialization mode, you must replace the base .sof (top.sof) with the revision .sof (cvp_app1.sof). You must also specify a different file name for the CvP revision. This example uses cvp_app.jic. The periphery and the core images created for the CvP revision are cvp_app.periph.jic and cvp_app.core.rbf, respectively. Follow these steps to create the periphery and core images for the CvP revision:
- On the File menu, select Convert Programming File. Under Output programming file specify the options in the following table. These settings are illustrated in the figure below.
Table 16. CvP Revision Design Flow: Output Programming File Options Parameter
Value
Programming file type
JTAG Indirect Configuration File (.jic)
Configuration device
EPCQ256
Mode
Active Serial x4
File name
Click browse and specify pcie_quartus_files/cvp_app.jic
Create Memory Map File
Turn this option on.
Create CvP files
Turn this option on. This box is greyed out until you specify the SOF Data file under Input files to convert.
- Under Input files to convert specify the options in the following table:
Table 17. CvP Revision Design Flow: Input Files to Convert Parameter
Value
Flash Loader
Click Add Device and select Stratix V and then 5SGXEA7K2.
Click SOF Data
Click Add File and navigate to ./pcie_quartus_files/cvp_app.sof. If you specified a compressed or encrypted bitstream in the Device and Pin Options dialog box, you must specify the same options in the Conversion Programming File window. To enable these settings, click cvp_app.sof , then click Properties and check the appropriate boxes.
- Turn on the Create CvP files (Generate cvp_app1.periph.jic and cvp_app1.core.rbf) parameter in the Output Programming Files section.
- To save the Conversion Programming File parameters, click Save Conversion Setup and type an output file name. Saving your conversion setup saves time on subsequent conversions. For this exercise, call your settings cvp_revision.cof. You can reload the conversion parameters by opening the Conversion Setup File ( *.cof) using Open Conversion Setup Data in the Convert Programming File window. The following figure illustrates these options.
- Click Generate. This conversion process creates the alternate core logic, cvp_app.core.rbf, and the periphery logic, cvp_app.periph.jic. The periphery logic, cvp_app.periph.jic, should be identical to the periphery logic created when splitting the base revision.
Note: The generated CvP peripheral file size matches the size of the configuration device chosen.Figure 34. CvP Revision Design Flow: Convert Programming Files
- Proceed to Bringing Up the Hardware.
The file top.cof provided in *_cvp * designs is a template for CvP initialization mode. You can open this file in the Open Conversion Setup Data of Convert Programming File window to retrieve the parameters shown in figure above.